Installing Dumps via Quark
This page will detail the setup of Quark, to allow for the direct installation of your game dumps across USB or wirelessly (LAN) using Leaflet.
Quark requires platform-specific setup depending on the operating system your computer is running.
Quark Setup
The following section will detail the USB and wireless setup for Quark on Windows, Linux and macOS.
Section I - Requirements
- The latest release of Quark.NET (
Quark-win-(architecture), based on your device's architecture)
Section II - Instructions
-
Download and open Quark.
About the Windows Defender SmartScreen pop-up
This pop-up can be dismissed, it solely appears because the app is unsigned (yes, the app is safe to run). To proceed with launching Quark you can click
More info>Run anyway. -
Connect your Switch while it's in Leaflet.
-
Click the red
Install Driverbutton near the top right of the window.About arm64 windows devices
The arm64 build of Quark.NET for Windows will not have this driver installation button. On this platform, you need to manually install the WinUSB driver according to the Zadig instructions below.
-
If you wish to use network functionality with Quark later, follow the instructions below:
Network: Allowing Quark through the Windows Defender firewall
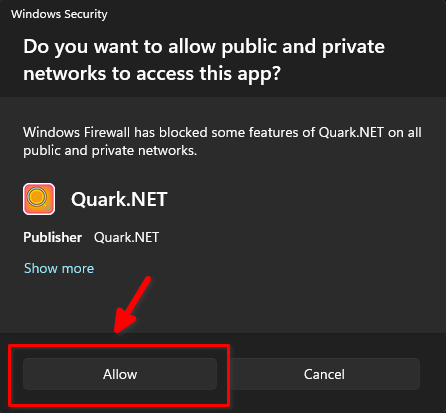
Follow the screenshot below to allow Quark to have network access:
Regarding network functionality, you will just need to allow Quark through Windows Defender firewall when Windows prompts you to either allow or deny Quark from having network access when you run Quark for the first time.
-
Once you've successfully launched Quark, click
+ Addin order to add a Content Path.About Content Paths
Content Paths are the paths at which your previously dumped content is stored. Leaflet will only be able to browse the contents of the Content Paths you configure.
You can configure as many folders/directories as you'd like, but usually your game dumps would be stored in a centralized location. An example Content Path would be:
C:\Users\user\Documents\switch-game-dumps. -
After you've followed these instructions, you're ready to start! Proceed to the Installing Your Games section below.
Driver Installation with Zadig
Follow these steps if you face issues when installing the driver with Quark. You will need the latest version of Zadig.
- Launch Zadig. In the
Optionsmenu, be sure thatList All Devicesis enabled. - Connect your Switch in RCM to your PC using the USB cable.
- In Zadig, select "Leaflet" in the device list.
-
Select
WinUSB (v6.1.7600.16385)in the driver list.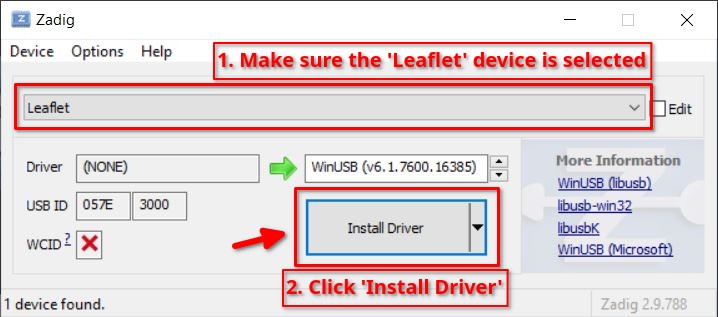
-
Click
Install Driverand wait for the installation to finish.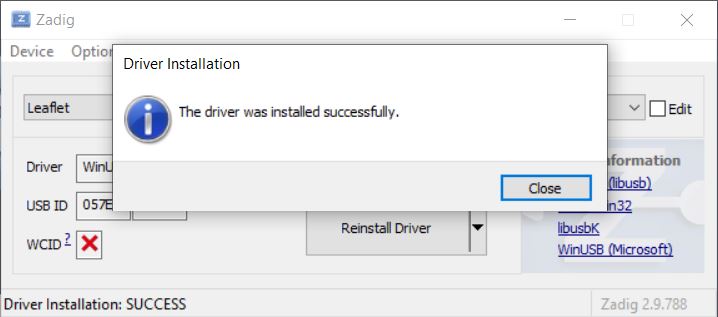
Section I - Requirements
- The latest release of Quark.NET (
Quark-linux-(architecture), based on your device's architecture)
Section II - Instructions
-
Open Quark for the first time. If you are unable to double-click the executable from your file browser to open Quark, follow the instructions below (this may not be relevant for every Linux distribution and file manager):
Running Quark: Setting executable permissions on an executable
Follow the instructions below to make the
Quark-linux-(architecture)executable:¶-
Open a terminal window and enter the following command:
sudo chmod +x /path/to/Quark-linux-(architecture)(replacing/path/towith the actual path to the executable). -
That's it, the executable is now executable. You should be able to launch Quark directly from your file manager.
-
-
For Linux you will need to set up the udev rule for non-root USB access:
Running Quark: Setting up root-less device access
-
Press the
Setup udevbutton near the top right of the window. -
Fill in your root password in the dialogue box that appears.
-
After Quark finishes reboot your computer.
-
-
If you wish to use network functionality with Quark later, follow the instructions below:
Network: Setting up the firewall rule for network access
Follow the instructions below to set up the firewall rule to allow network access
- Some Linux distributions (notably EndeavourOS) require port 2313 to be open in the firewall. With firewalld this is done by running the following commands:
sudo firewall-cmd --add-port=2313/tcp --permanent sudo firewall-cmd --reload- If you use UFW, you'd run the following commands:
sudo ufw allow 2313/tcp
sudo ufw reload
Do note that Fedora and Ubuntu-based distributions typically do not require you to set up a firewall rule.
-
Once you've successfully set up the udev rule, click
+ Addin order to add a Content Path.About Content Paths
Content Paths are the paths at which your previously dumped content is stored. Leaflet will only be able to browse the contents of the Content Paths you configure.
You can configure as many folders/directories as you'd like, but usually your game dumps would be stored in a centralized location. An example Content Path would be:
/home/<user>/Documents/switch-game-dumps. -
After you've followed these instructions, you're ready to start! Proceed to the Installing Your Games section below.
Section I - Requirements
- The latest release of Quark.NET (
Quark-osx.zip)
Section II - Instructions
-
Regarding network functionality, if you wish to use network functionality with Quark later, you typically do not need to change anything macOS firewall related. If you do run into connectivity related issues, follow the instructions below:
Network: Setting up the firewall rule for network access (usually optional)
Follow the instructions below to set up the firewall rule to allow network access
- Navigate to System
Settings>Network>Firewalland enable the firewall slider (if it isn't enabled already). - Click
Options...and click the+button, then navigate to the location where you've downloadedQuark.appand clickOpen. - Leave the default configuration for Quark (leave the default rule as
Allow incoming connections). - That's it, this should resolve any connectivity issues with Quark if you experience any.
- Navigate to System
-
Open Quark and click
+ Addin order to add a Content Path.About Content Paths
Content Paths are the paths at which your previously dumped content is stored. Leaflet will only be able to browse the contents of the Content Paths you configure.
You can configure as many folders/directories as you'd like, but usually your game dumps would be stored in a centralized location. An example Content Path would be:
/home/<user>/Documents/switch-game-dumps. -
After you've followed these instructions, you're ready to start! Proceed to the Installing Your Games section below.
Installing Your Games
The following section will detail the USB and wireless (LAN) methods of installing your game dumps. Click the tab corresponding to the method you'd like to use below.
- If you haven't already, launch HBMenu and open Leaflet.
- If it isn't already open, open Quark on your PC.
- Plug your Switch into your PC via USB.
- In Leaflet, select
Install from Quark. - Select
USB. - Connect your Switch to your PC via USB Cable.
- Navigate to the location of your NSPs on your Switch and select them with
A. - Press the Plus button (
+) and select whether you want to install to the SD card or NAND. - After the installation has finished, Press the home button to exit to the home menu.
- You should now see that your dump was installed.
- If you haven't already, launch HBMenu and open Leaflet.
- Note: Please make sure your Switch and PC are connected to the same network, otherwise you will not be able to connect to Quark on your PC.
- If it isn't already open, open Quark on your PC.
- In Leaflet, select
Install from Quark. - Select
Wireless (LAN). - Select
Enter new host.... - Enter the IP Address of your PC running Quark. This can be found in the top right of the window directly after
Network IP:. After confirming you entered it correctly press+to confirm. - Optionally enter a unique name for this PC. Then press
+to confirm. - Navigate to the location of your NSPs on your Switch and select them with
A. - Press the Plus button (
+) and select whether you want to install to the SD card or NAND. - After the installation has finished, Press the home button to exit to the home menu.
- You should now see that your dump was installed.